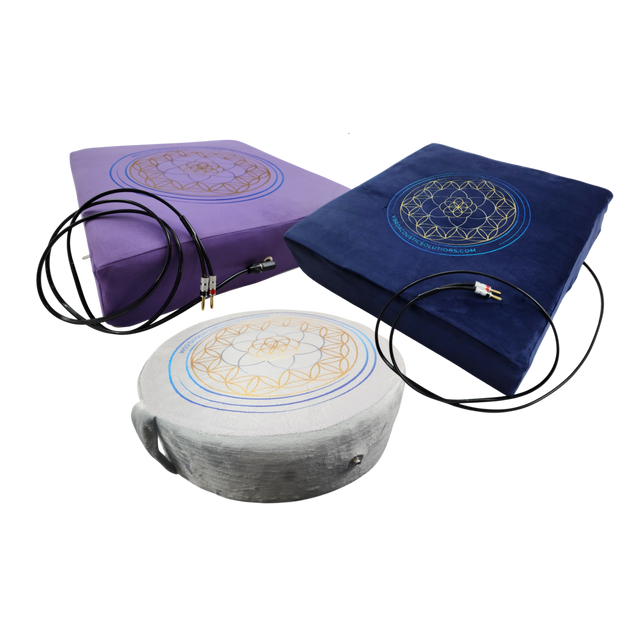
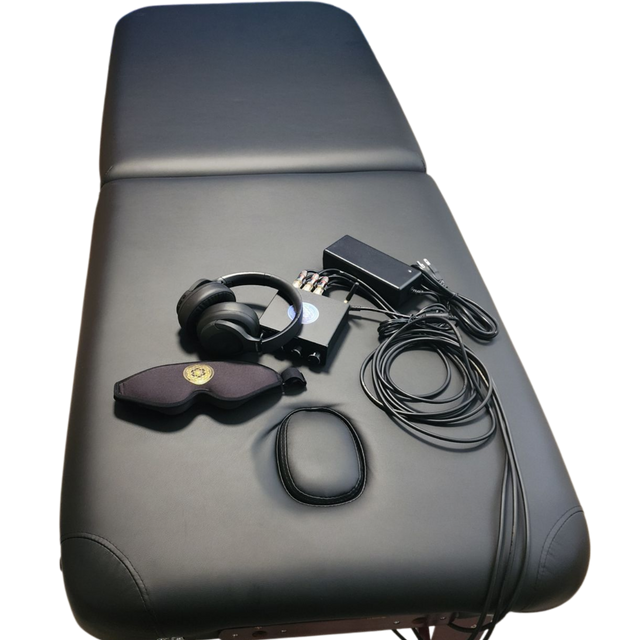
A treatment table, recliner, or favorite home bed can become a therapeutic sound environment without being replaced. That is the appeal behind a DIY vibroacoustic kit. This DIY vibroacoustic kit review examines what the conversion experience actually feels like, how the hardware creates body-based low-frequency stimulation, and where a kit makes more sense than a purpose-built vibroacoustic bed.
The short answer is that a well-designed kit can deliver a remarkably substantial experience when it is correctly matched to the furniture, amplifier, and intended user. It is not simply a speaker placed under a mattress. The quality of low-frequency transducers, their placement, the frequency control available, and the stability of the mounting surface all determine whether a session feels grounding and evenly distributed or merely rumbly.
How a DIY Vibroacoustic Kit Works
Vibroacoustic therapy uses sound in a range the body can physically perceive. Audio signals travel from a source through an amplifier to tactile transducers, sometimes called vibration speakers or exciters. Rather than primarily moving air as a conventional speaker does, a transducer transfers mechanical energy into the furniture. The body then experiences low-frequency sound as rhythmic vibration through contact points such as the back, hips, legs, and feet.
Most therapeutic applications center on low frequencies between about 20 and 120 Hz. At 20 to 40 Hz, the sensation is often slow, heavy, and deeply physical. Many people choose this range when they want to settle after a demanding day or support post-exertion recovery. Frequencies around 40 to 60 Hz can feel more present through the torso and larger muscle groups, while 60 to 120 Hz may create a lighter, more stimulating texture depending on volume and the surface being used.
The physiological value is not only about hearing a tone. Repetitive, predictable sensory input can support somatic regulation by giving the nervous system a stable signal to orient around. Slow music, breathing, and tactile vibration can work together to encourage a shift away from heightened vigilance and toward rest. Clinical vibroacoustic research has explored outcomes related to relaxation, pain perception, motor support, and quality of life, although protocols vary widely by frequency, session length, music selection, and population.
A 2022 systematic review of vibroacoustic interventions found promising benefits across several health and wellness contexts, while also highlighting the need for more standardized treatment protocols. That nuance matters. A DIY system is most useful when viewed as a flexible therapeutic tool - one that can complement massage, breathwork, rest routines, sensory regulation plans, and practitioner-led care.
What Comes in a Quality DIY Kit
The best conversion kits are designed as a system, not as a collection of unrelated audio parts. Expect tactile transducers, an appropriately matched amplifier, connecting cables, mounting hardware, and setup guidance. Some packages include frequency-specific audio or recommendations for compatible playback methods.
The amplifier matters more than many first-time buyers expect. A transducer needs enough clean power to reproduce low frequencies without distortion, but more wattage is not automatically better. An oversized amplifier can overwhelm a lightweight recliner frame or create an unnecessarily intense experience. A properly matched system gives you usable adjustment range, particularly at lower listening levels where therapeutic sessions often begin.
Furniture compatibility is the other major variable. A solid wood massage table, platform bed, or upholstered treatment table generally transmits vibration differently than a thin metal frame or a heavily sprung sofa. Dense, stable surfaces tend to distribute energy with more consistency. Softer materials can feel luxurious but may absorb some vibration, requiring careful transducer placement and modest volume adjustments.
For clinics, the value of a DIY kit is often its adaptability. A massage therapist may mount the system to an existing table and introduce low-frequency sound during the settling phase of a session. A somatic practitioner may integrate it into guided relaxation. Home users may install it beneath a bed or recliner to create a dedicated sensory recovery space without redesigning an entire room.
DIY Vibroacoustic Kit Review: Setup and Installation
Installation is manageable for most people who are comfortable following basic hardware instructions, but it should not be rushed. Plan for approximately one to two hours for an initial setup, including testing. The goal is not just to attach the transducer securely. You are also finding the position where vibration reaches the body evenly without producing rattles, loose-frame noise, or a concentrated hotspot.
Start with the furniture empty. Mount the transducer where it has direct, stable contact with the frame or support structure. On a massage table, placement near the center often creates balanced transmission through the torso and pelvis. On a bed, placement may need to shift based on the frame design, mattress thickness, and whether the goal is whole-body immersion or more localized sensation.
Run cables so they are protected from feet, wheels, and moving table parts. In professional settings, cable management is part of safety and presentation. Clients should not see a tangle of cords when they enter a treatment room designed to feel calm and clinically intentional.
Then test at low volume using a simple sine wave or low-frequency track. Listen for mechanical buzzing separate from the intended vibration. A rattle usually means a loose screw, an unsupported panel, or an item touching the frame. Correct these issues before increasing intensity. A clean system often feels quieter in the room than expected because much of the experience is traveling through the furniture rather than filling the space with audible bass.
The Experience: Where DIY Systems Shine
A conversion kit earns its place when the furniture already fits the user and the room. There is something meaningful about turning a familiar bed into a reliable evening regulation practice, or turning a practitioner’s existing table into a multi-sensory treatment surface. The body recognizes comfort and safety in familiar surroundings, and vibroacoustic stimulation can add another layer of therapeutic support.
For many users, the most noticeable effect is not dramatic vibration. It is the gradual sense of being physically held by a slow, organized rhythm. A session may pair 30 to 40 Hz tactile sound with gentle instrumental music, nature audio, or tones chosen for personal resonance. Frequencies such as 432 Hz and the 7.83 Hz Schumann resonance hold special meaning in many sound-healing traditions. When incorporated through the audible music layer, they can help create an environment that feels emotionally resonant as well as physically calming.
The system also offers meaningful control. A practitioner can use lower intensity during intake or guided meditation, then adjust the session around the client’s comfort and sensory preferences. At home, users can build short 15- to 30-minute routines rather than relying on a one-size-fits-all program.
Trade-Offs to Consider Before Buying
A DIY kit is not the best choice for every setting. A purpose-built vibroacoustic bed usually provides more engineered resonance, integrated controls, and a polished appearance from the first session. It can be the better option for high-volume clinics, dedicated sound therapy spaces, or users who prefer a complete, ready-to-use system.
A conversion kit requires more participation. You need to choose the furniture, complete the installation, and spend time learning what frequencies and volume levels feel appropriate. Results also depend on the structure beneath the body. Two identical kits can feel very different on a thick upholstered recliner and a firm professional table.
There are practical limitations as well. A kit cannot correct an unstable, creaky, or poorly supported piece of furniture. It should not be installed where hardware could interfere with electronic table functions, adjustable mechanisms, or safe client transfers. Anyone with a medical device, acute health concern, pregnancy-related question, or condition involving vibration sensitivity should consult an appropriate qualified clinician before beginning a new vibration-based practice.
Who Will Get the Most Value From a DIY Kit?
This format is especially compelling for practitioners who already own a quality table and want to expand their services without purchasing a second piece of large equipment. It is equally well suited to home users who want a dedicated support tool for stress recovery, sleep preparation, chronic tension, or sensory decompression.
The strongest fit is someone who appreciates adjustability. Vibroacoustic therapy is personal: a frequency that feels settling to one person may feel too intense or too subtle to another. Starting low, using shorter sessions, and tracking comfort over time creates a safer and more informative path than chasing maximum vibration.
Vibroacoustic Solutions approaches DIY conversion with that principle in mind: clinical-grade components should make therapeutic technology more accessible, not make the experience complicated. The best kit is one that becomes easy to use consistently because it fits your body, your furniture, and your real daily rhythm.
A thoughtfully installed DIY vibroacoustic system does more than add bass to a room. It creates a place where sound is felt, not merely heard - a steady physical invitation to pause, soften, and return attention to the body.
Najnowsze posty