A well-designed chronic pain relief room example does not need to look clinical or complicated. It needs to give the body clear, repeatable cues of safety: steady low-frequency vibration, supportive positioning, comfortable temperature, reduced visual demand, and enough quiet to let the nervous system downshift. For someone living with persistent pain, the room itself can become part of a reliable recovery routine.
The goal is not to chase a dramatic sensation. It is to create a space where physical tension, sensory overload, and the vigilance that often accompanies chronic pain can gradually soften. That makes room design especially useful for home users, massage therapists, and integrative clinics seeking a non-invasive complement to individualized care.
Why a Pain-Relief Room Starts With Frequency
Vibroacoustic therapy works through mechanical sound vibration delivered into the body through a bed, chair, cushion, or treatment table. Low-frequency sound, generally between 20 and 120 Hz, is felt as vibration rather than heard as a conventional musical tone. As a transducer moves, it transfers rhythmic mechanical energy through the surface supporting the body. This may create a gentle micro-massage effect in tissues while offering the nervous system a predictable sensory signal.
That predictability matters. Persistent pain can be accompanied by protective muscle guarding, disrupted sleep, heightened stress reactivity, and a nervous system that has difficulty settling after stimulation. Slow, consistent vibration paired with calming audio gives the body an organized sensory experience. Many sessions use frequencies in the 30 to 80 Hz range, where the vibration is easy to feel through the back, hips, legs, or shoulders without becoming aggressive.
Research into vibroacoustic intervention has explored outcomes such as relaxation, pain perception, muscle tone, sleep quality, and autonomic regulation. Results vary by protocol, health history, frequency selection, session length, and the environment itself. That is why the most effective room is not simply one with more equipment. It is one designed to make a consistent, tolerable practice easier to return to.
A Chronic Pain Relief Room Example: The Core Layout
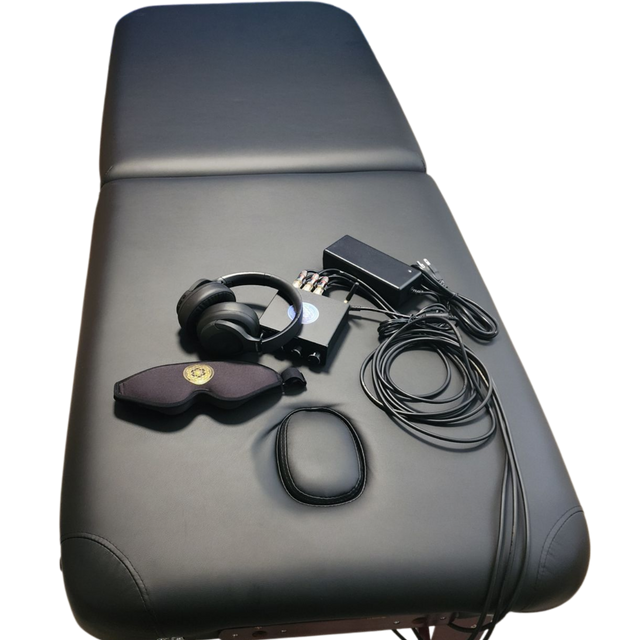
Picture a spare bedroom, den, or 8-by-10-foot corner of a larger wellness office. The focal point is a vibroacoustic bed or a padded massage table fitted with a vibroacoustic attachment kit. Place it so there is clear access on both sides and so the person using it can enter and leave without twisting, rushing, or navigating clutter.
The support surface should be the priority. For low back pain, hip discomfort, widespread tenderness, or post-exertion soreness, a flat and stable surface often allows vibration to distribute more evenly than a deeply cushioned recliner. Add a small knee bolster to reduce strain through the low back and hip flexors when lying supine. A cervical pillow or folded towel can support the neck, but avoid raising the head so much that the upper body feels compressed.
Set the system controls within arm's reach. A person in pain should not have to stand up repeatedly to change volume, stop a session, or adjust a program. In a clinic, this also allows the practitioner to begin at a comfortable setting, check in after a few minutes, and make gradual changes without disrupting the therapeutic atmosphere.
A practical setup includes a dedicated blanket, a washable cover, and a nearby basket for eye pillows, earplugs, and bolsters. These are small details, but they reduce decision fatigue. When a pain flare occurs, a room that is ready to use is far more valuable than a room that requires setup.
Suggested Starting Settings
For a first session, use a lower intensity than seems necessary. The body often responds better to an invitation than a challenge. A 20- to 30-minute session with gentle vibration in the 30 to 50 Hz range can be a useful place to begin, particularly for people who are sensitive to touch, sound, or movement.
A slower, more grounded program around 20 to 40 Hz may feel supportive during periods of high stress or when the goal is rest. Frequencies around 40 to 60 Hz are commonly selected for a more noticeable whole-body vibrational experience. Some people prefer a broader sweep through several low frequencies, while others find repetition more regulating. The right choice depends on comfort, sensory preferences, and how the body feels in the hours after a session.
Keep audible music at a level that allows the vibration to remain the primary physical experience. Gentle instrumental sound, nature recordings, or frequency-based compositions can work well. For those drawn to 432 Hz music or other meaningful tonal traditions, the room can honor that preference while still keeping the tactile low-frequency program at the center of the session.
Design the Sensory Field, Not Just the Furniture
Pain can make ordinary sensory input feel demanding. Bright overhead lights, a cold room, synthetic fragrance, tangled cords, or a phone buzzing on the nightstand can all pull attention back toward vigilance. The best pain-relief rooms use fewer inputs, selected with care.
Choose warm, dimmable lighting rather than bright white bulbs. A small lamp positioned outside the direct line of sight is usually more comfortable than ceiling lighting. Use colors that feel quiet and grounding: warm neutrals, muted greens, soft blue-grays, or natural wood tones. The aim is not a particular aesthetic. It is visual simplicity.
Temperature is equally practical. Keep a light blanket nearby because relaxation can change a person's perception of warmth. If airflow is helpful, use a quiet fan that does not blow directly onto the face. Avoid strong scents by default, especially in a professional setting. Essential oils can be meaningful for some clients, but scent sensitivity is common, and an unscented room is usually the most adaptable baseline.
A wall clock should be visible from the treatment position only if it reassures the user. For many people, watching the minutes pass works against rest. A simple timer with a soft chime is often a better choice.
Build a Repeatable Session Ritual
The therapeutic value of the room grows when it is used consistently. Before beginning, take one minute to notice the current pain level, tension pattern, energy, and mood without trying to fix any of it. This creates useful feedback over time and helps distinguish a session that feels calming in the moment from one that supports recovery later in the day.
Settle into the support surface, begin the audio and vibration, and give the body five minutes before deciding whether an adjustment is needed. Early discomfort is not always a sign that the session is wrong, but sharp pain, nausea, dizziness, agitation, or numbness are signals to lower intensity, reposition, or stop. Comfort is the guide.
After the session, avoid jumping directly into work, errands, or difficult conversations when possible. Leave five to ten minutes for hydration, gentle walking, journaling, or simply sitting quietly. This transition period helps preserve the regulated state the session was designed to support.
For home use, three shorter sessions each week may be more sustainable than a single long session. In a clinical environment, vibroacoustic therapy can be integrated before hands-on bodywork to help clients arrive in a calmer state, or after a session to extend rest and integration. It should be adapted around each person's care plan, symptom pattern, and practitioner guidance.
Equipment Choices Depend on the Room
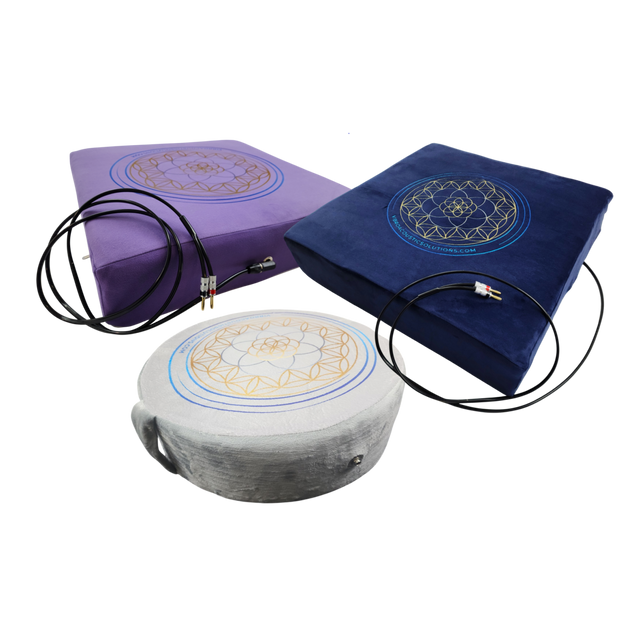
A dedicated vibroacoustic bed offers the most immersive option for a room centered on regular recovery. It is ideal when the person will use the space frequently and wants full-body contact with the vibration. A massage table attachment kit is often the better fit for practitioners who need to preserve the function of an existing table while adding a clinical-grade sensory modality.
For apartments, shared homes, or smaller offices, a vibroacoustic cushion can create a focused support station in a favorite chair, recliner, or reading corner. It will not produce the same body-wide contact as a bed, but it can make a consistent practice more accessible. A DIY conversion kit may suit someone who already has a sturdy treatment table or platform and wants to build a customized setup.
Vibroacoustic Solutions designs these options around the same central principle: therapeutic low-frequency vibration should be practical enough to use consistently, not reserved for a rare spa visit or specialty facility.
Let the Room Evolve With the Person Using It
A chronic pain relief room is not finished when the equipment is installed. It improves through observation. If a person avoids using it, the issue may be the lighting, the room temperature, the effort required to prepare, or an intensity setting that feels too strong. If they use it faithfully but feel overstimulated afterward, shorter sessions and simpler audio may be more appropriate.
The most supportive space is one that respects fluctuation. Some days call for 15 quiet minutes with low vibration and a blanket. Other days may allow a longer session with more audible sound, breathwork, or gentle mobility afterward. By making recovery feel available rather than demanding, the room becomes a steady place to return to when the body needs care.
Najnowsze posty

Vibroacoustic Systems for Therapeutic Regulation
Read article
Tactile Audio Versus Headphones for Regulation
Read article
Dlaczego warto stosować przetworniki do stołów do masażu w praktyce?
Read article